")
Preparing for the Installation
Mounting a TV requires careful preparation to ensure stability and safety. Rushing the process without proper planning can lead to misalignment, wall damage, or even an unstable setup. Before starting, it’s important to choose the right mount, gather essential tools, and determine the type of wall you’ll be working with. These steps will help create a secure and professional-looking installation.
Choosing the Right Wall Mount for Your TV
Wall mounts come in different styles, each serving a specific purpose. Fixed mounts keep the TV flush against the wall, while tilting mounts allow for slight angle adjustments. Full-motion mounts provide the most flexibility by allowing the screen to swivel and extend outward. The right choice depends on your viewing preferences and the layout of your space. Additionally, checking the compatibility of the mount with your TV’s size and weight is essential to avoid stability issues.

Gathering the Necessary Tools and Materials
A smooth installation requires the right tools and materials. A stud finder helps locate secure points for mounting, while a level ensures the TV is straight. Measuring tape is necessary for accurate placement, and a drill with appropriate bits makes installation easier. Depending on the wall type, specific anchors or screws may be required to provide a strong hold. Having everything ready beforehand prevents interruptions and ensures a hassle-free setup.
Checking the Wall Type (Drywall, Concrete, Brick)
Different wall materials require different mounting techniques. Drywall installations are most secure when anchored into wooden studs, while concrete and brick walls need specialized anchors for a firm hold. Using the wrong hardware can compromise stability, increasing the risk of the mount loosening over time. Before drilling, identifying the wall type ensures the correct installation method is used for a durable and safe setup.
Selecting the Best Wall Location
Choosing the right wall to mount your TV is essential for a comfortable and visually appealing setup. The ideal location should provide a clear view from your seating area without obstructions. Consider the room’s layout, furniture arrangement, and natural light sources to minimize glare. A well-placed TV enhances the overall viewing experience while blending seamlessly with your home’s design.

Finding the Perfect Height for Comfortable Viewing
Mounting your TV at the right height helps prevent neck and eye strain. The best position is where the center of the screen aligns with your eye level when seated. This allows for a natural viewing angle without the need to tilt your head up or down. The height may vary based on seating arrangements, but the goal is to maintain a relaxed and immersive experience. Proper placement ensures long-term comfort, especially during extended watching sessions.
Ensuring Wall Studs or a Solid Surface for Mounting
A secure installation is crucial for both safety and durability. Wall studs provide strong support for the TV mount, preventing accidents caused by weak attachments. Using a stud finder helps locate these support points within the wall. If studs are not available, alternative solutions like heavy-duty anchors or mounting boards can be used. Ensuring a solid foundation keeps your TV securely in place, protecting both your wall and the device itself.
Considering Cable Management for a Clean Setup
A well-organized cable system enhances both functionality and aesthetics. Exposed wires can create clutter and potential hazards, so planning cable management is key. Options include in-wall cable routing, external covers, or furniture placement to conceal cords. Keeping cables neatly arranged improves the appearance of your setup and makes it easier to access connections when needed. A clean and organized space contributes to a polished and professional installation.
Marking and Drilling the Holes
Installing a TV wall bracket requires careful preparation to ensure stability and proper alignment. A key part of this process is accurately marking and drilling the holes. Proper planning prevents mistakes, reduces the risk of damage, and ensures a secure installation.

Measuring and Marking Drill Points Accurately
Before drilling, precise measurements are essential. Start by deciding the ideal height for the TV based on comfortable viewing angles. Using a measuring tape, mark the drill points where the wall mount will be attached. A level is important to ensure the marks are straight, preventing an uneven installation. Taking the time to verify these markings helps avoid errors that could lead to rework or misalignment.
Using a Stud Finder for Secure Installation
To securely mount the TV, the bracket should always be attached to wall studs rather than just drywall, as studs provide the strength needed to hold the weight safely. Using a stud finder helps you locate these solid points within the wall, and marking the center ensures the screws anchor firmly. This step is crucial because mounting directly into drywall without proper support can cause instability or long-term damage. For more mounting tips and reliable hardware, you can get premium TV brackets for safe installation to ensure your setup stays secure and professionally supported.
Drilling Pilot Holes Safely and Efficiently
Drilling pilot holes makes it easier to insert screws while reducing the chance of cracking or splitting the material. Selecting the correct drill bit size ensures a snug fit for the mounting screws. Keeping the drill steady and applying consistent pressure prevents misalignment. Once the holes are drilled, clearing out debris ensures a smooth and secure installation.
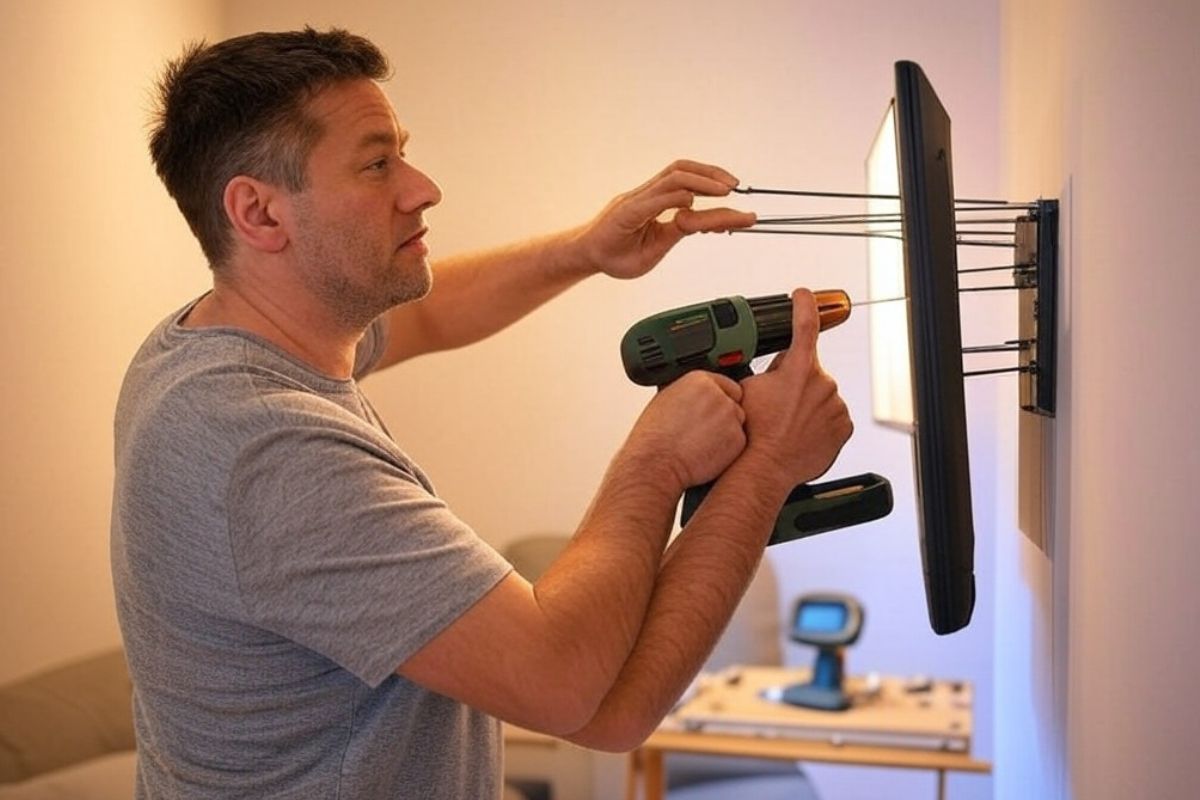
Attaching the Mount to the Wall
Attaching a TV mount to the wall is a critical part of the installation process, ensuring your TV stays secure and properly positioned. The first step in this process is aligning the bracket with the drilled holes. You should position the wall mount on the wall, ensuring the holes on the mount align with the pilot holes you’ve drilled into the wall studs. It’s important to use a level to check that the mount is straight before moving forward. This step ensures the TV will hang evenly, preventing any tilt or imbalance. For mounting brackets and additional accessories, visit Buy security cameras.
Once the bracket is correctly aligned, the next step is securing it with the right screws and anchors. The screws should be inserted into the holes of the bracket, driving them into the wall studs. It’s crucial to use the correct size screws to ensure the bracket is tightly attached to the wall. If the studs are not located where needed, you may need to use wall anchors to give extra support. Make sure to tighten the screws adequately but be careful not to overtighten, as this can damage the wall or mount.
Finally, double-checking the stability of the mount is essential before hanging your TV. Once the bracket is secured, gently test its stability by applying slight pressure. If it feels loose or shifts when pushed, reassess the mounting to ensure it’s properly attached. Checking the level one more time is also a good idea, as adjustments might have been made during the securing process. This final check ensures that your TV will be safely supported and correctly positioned on the wall.
Mounting the TV Securely
Mounting a TV securely requires a few key steps to ensure the installation is both stable and safe. The first step is attaching the mounting arms to the back of the TV. These arms are designed to connect the TV to the wall bracket, and it’s important to use the correct screws and washers included in the mounting kit. Make sure the arms are securely fastened to avoid any risk of the TV becoming loose later on. Most TVs come with pre-drilled holes for this purpose, making the attachment process straightforward.
Once the mounting arms are properly secured, the next step is to lift the TV and place it onto the wall bracket. This step can be tricky, especially if the TV is large or heavy, so it’s best to have someone help you. Before lifting the TV, ensure that the wall bracket is securely attached to the wall. Ideally, it should be anchored into studs for maximum support. Once the TV is aligned with the bracket, carefully lift it and lock the mounting arms into place. Some mounts feature a locking mechanism that ensures the TV stays secure once it’s mounted, so make sure this is engaged after positioning the TV.
Lastly, it’s important to check the tilt and swivel features, if your mount supports them. These adjustments allow you to change the angle of the TV for a better viewing experience. Gently test the tilt and swivel functions to ensure they work smoothly and that the TV remains stable. If you encounter any resistance or difficulty, check the mount to ensure everything is tightened properly. Once everything is tested and adjusted, your TV will be securely mounted, ready for use.

Cable Management and Final Adjustments
When finishing up a TV wall mount installation, there are a few important steps to ensure everything looks clean and works smoothly. First, cable management is key to a neat and organized space. After mounting your TV, you’ll want to hide the cables to avoid the clutter of wires hanging down. Using cable management systems or covers is a simple way to keep the cables out of sight, giving your setup a polished look. Some may even choose to run cables inside the wall for a seamless finish, depending on their preferences and the setup.
Next, it’s essential to double-check all connections. Securely connecting your cables ensures that everything works properly without interruptions or performance issues. Take the time to inspect each connection, from HDMI to power cables, making sure they’re tightly plugged in. Loose or poorly connected cables can cause poor signal quality or even damage your equipment.
Finally, adjusting the TV angle is the last step. Many modern wall brackets allow you to adjust the tilt or swivel of the TV, so you can find the perfect angle for viewing. This adjustment ensures the TV is positioned for optimal comfort, reducing glare and providing the best picture quality. Taking a moment to adjust the screen to your preferred angle will make a significant difference in the overall viewing experience.
By focusing on these final adjustments—managing cables, securing connections, and adjusting the TV angle—you can complete your TV wall mount installation with ease and enjoy a tidy, functional, and comfortable viewing setup.
Safety Tips and Troubleshooting
When installing a TV wall bracket, there are a few key safety tips and troubleshooting steps to keep in mind to ensure a smooth and secure setup. One of the most important factors to consider is avoiding common installation mistakes. These mistakes can range from not properly securing the bracket to the wall, to using the wrong screws or anchors. For example, mounting a bracket on drywall without the proper anchors or missing the studs can lead to the bracket coming loose over time, which is a major safety concern. It’s crucial to follow the instructions carefully and make sure the bracket is level and aligned correctly to avoid these issues.
Another important step is to check the weight limits and ensure the bracket is compatible with your TV. Each bracket has a specified weight capacity, and exceeding this can put undue stress on the wall and the bracket itself, potentially leading to failure. Always verify the TV’s weight and size and match it with the bracket’s specifications. Some brackets are designed specifically for certain types of TVs, such as flat or curved models, so ensuring compatibility will help keep your setup stable.
If your TV feels unstable after installation, it’s essential to address the issue right away. Unsteadiness can occur if the screws are too loose, the bracket wasn’t installed correctly, or if the TV isn’t properly supported. It’s important to check that all screws are tightened securely, and the bracket is anchored properly into the wall studs. If the instability persists, additional support like anti-tip straps can help ensure the TV remains safe and secure, particularly in homes with young children or pets.
By taking care to avoid installation mistakes, ensuring compatibility, and addressing any stability concerns, you can enjoy a securely mounted TV with peace of mind.
FAQs:
1. Where can I buy TV wall mount screws?
You can find TV wall mount screws at various hardware stores, including Bunnings. They offer a range of screws compatible with different TV wall mounts and brackets. Make sure to check the screw size and thread type specified for your wall mount to ensure a proper fit. If you’re unsure about which screws to purchase, Bunnings staff can help guide you based on your mount’s specifications.
2. How much does TV wall mount installation cost?
The cost of TV wall mount installation can vary depending on the complexity of the setup and the service provider. On average, installation prices range from $100 to $300, with some companies offering a flat rate for standard installations. Factors such as the type of wall (drywall, brick, concrete) and the need for additional tools or brackets may affect the price. Always check with the installation company for a detailed quote before proceeding.
3. Does Officeworks offer TV wall mounts?
Yes, Officeworks offers a selection of TV wall mounts suitable for different TV sizes and types. They provide both fixed and adjustable mounts, which can be purchased online or in-store. If you’re looking for TV wall mounts at Officeworks, it’s a good idea to check their website for availability and specifications or visit a nearby store for expert advice on installation and product choices.